
Like for Like Transfers
The Like for Like Transfer Process allows the user to transfer a service from another service provider (where the line is currently either WLR2 or WLR3) and retain the same line configuration as it currently has (except for WLR2 lines with Call Minder, which is replaced with Wholesale 1571).
Having chosen "Transfer service Like for Like" shortcut there are then three options presented, see below:
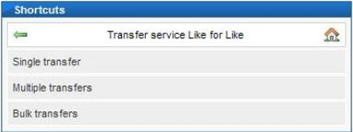
These different options allow flexibility for the user to manage transfers, where one or more are required for the same customer.
Single Transfer Process
This should be used to transfer lines one at a time, for instance when the customer only has one line to be transferred.
The first screen shown provides the user with the option to find the name of an existing company in the inventory - this should be used if the line being transferred belongs to an existing customer. Using this search ensures all lines for a particular customer are saved in the inventory under the same name, making future management easier. The search screen is below:

If the line being transferred is for a new customer then this step in not required and the "Skip" button can be clicked.
The next screen is used to capture the specific details of the transfer:
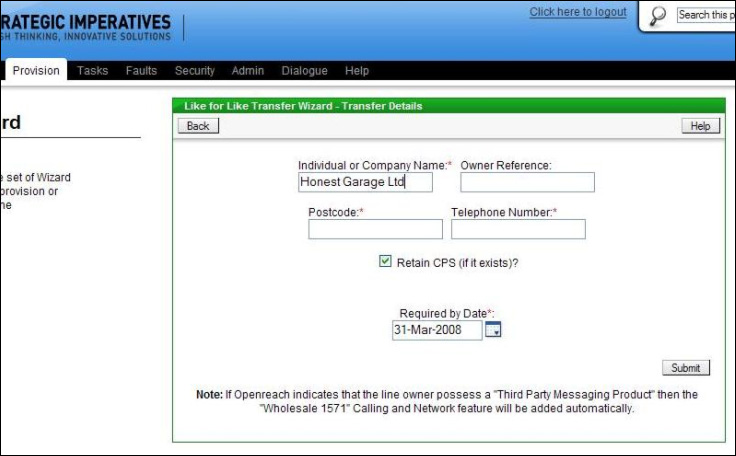
If the Line Owner was an existing customer chosen on the previous screen then this field will be pre-filled with that information. If the previous screen was skipped then the customer name must be entered at this stage. The "Owner Reference" field allows the user to enter their own, optional, reference for that customer - for instance a short name that is easier to remember than the customer's full name or a cost code.
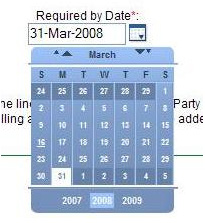
There are fields for the capture of the line number and the installation postcode, which are mandatory. There is a tick box to indicate whether CPS should be retained (if CPS is on the line). Lastly the "Required by Date" box is pre-filled with a transfer date in 10 working days time, which is the minimum leadtime for this process; if required the user can change the transfer date to a future date (as long as it's a working day), there is a "calendar" button to allow this to be done easily using a pop-up calendar.
Once the screen has been completed click the "Submit" button to send the transfer request to Openreach.
Multiple Transfers
This can be used where more than one line is to be transferred; using this process allows a batch of lines to be added to one request and is intended to reduce the time taken to process the transfer requests compared to entering them using the "Single Transfer" process.
The process is similar to the Single Transfer process, except an existing customer name cannot be searched for, as this process is capable of processing transfers for multiple customers at the same time.
The screen for capturing the details of the transfers is below:
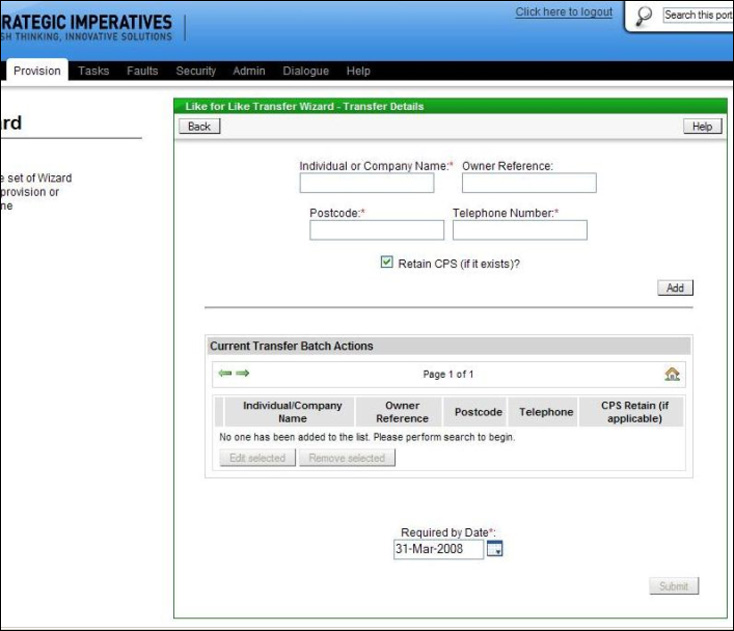
For each transfer required the Company Name must be entered. The "Owner Reference" field allows the user to enter their own, optional, reference for that customer - for instance a short name that is easier to remember than the customer's full name or a cost code.
There are fields for the capture of the line number and the installation postcode, which are mandatory. There is a tick box to indicate whether CPS should be retained (if CPS is on the line).
Once the details for a transfer have been entered then click the "Add" button to add the transfer request to the batch. The process of adding transfers to the batch can be completed for each transfer that is required until the batch is complete, see below for an example:
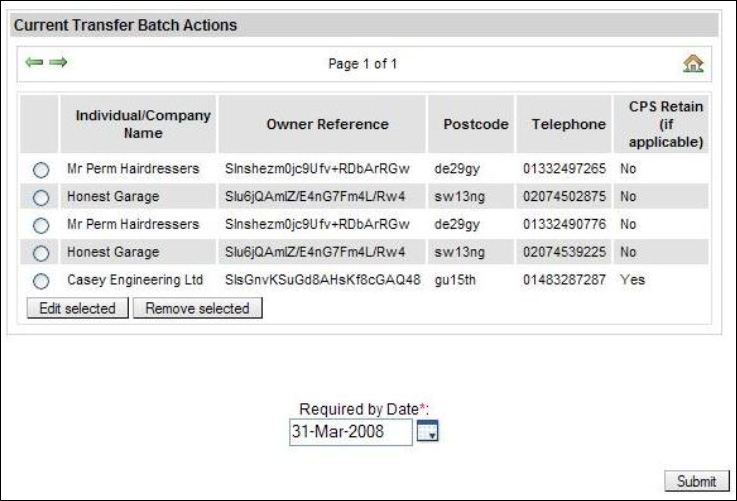
The "Required by Date" box is pre-filled with a transfer date, which applies to all transfers in the batch, in 10 working days time, which is the minimum leadtime for this process; if required the user can change the transfer date to a future date (as long as it's a working day), there is a "calendar" button to allow this to be done easily using a pop-up calendar.

Transfers already added to the batch can be changed or removed by selecting them in the list and clicking the "Edit selected" or "Remove selected" button as necessary.
Once the screen has been completed click the "Submit" button to send the transfer batch request to Openreach.
Bulk Transfers
This process can be used where the transfer of a large number of lines is required, and where perhaps the information is currently in a spreadsheet or text file and can easily be manipulated into the right format then copied and pasted across to the Portal. The screen is shown below:
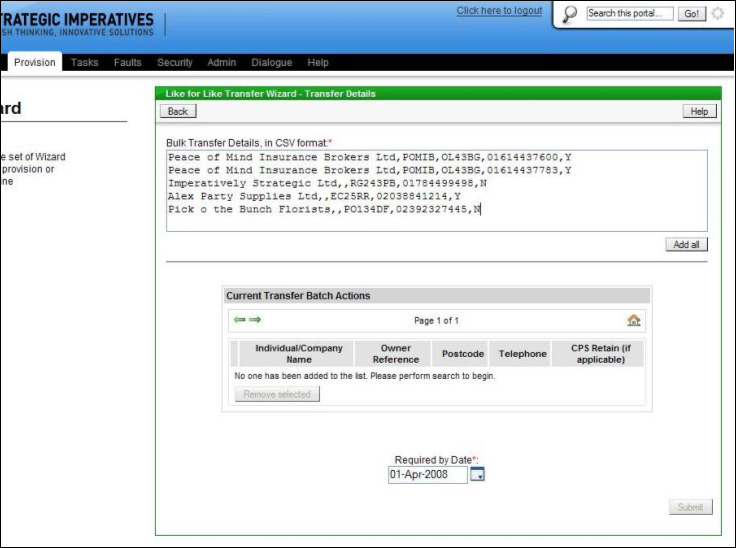
The details of the transfers should be entered or pasted into the large text box, with the details of one transfer per line. The data should be entered in Comma Delimited format, with the fields in the following order:
- Individual/Company Name for the line (mandatory)
- Owner Reference (optional)
- Installation Postcode (mandatory)
- Line Number (mandatory, no spaces allowed)
- CPS Retain Required (mandatory, must be either "Y" or "N")
Once the data has been entered then click the "Add all" button to add the transfers to the batch, see below for an example batch:
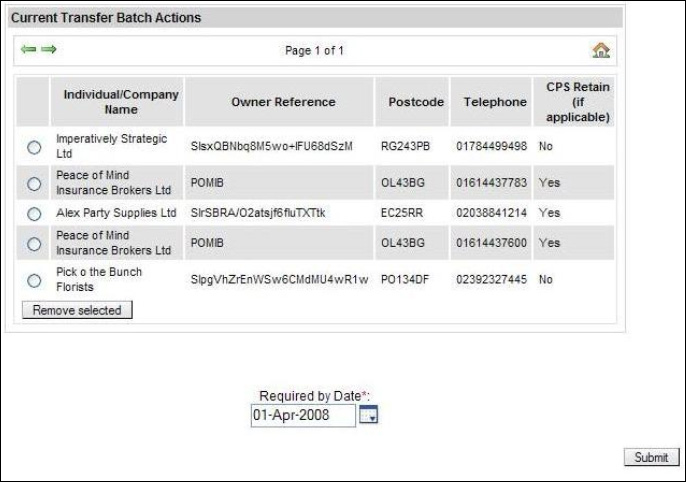
Further transfers can be added to the batch, if required, by entering them into the large text box and clicking the "Add all" button - this process can be repeated until all required transfers are added to the batch.
The "Required by Date" box is pre-filled with a transfer date, which applies to all transfers in the batch, in 10 working days time, which is the minimum leadtime for this process; if required the user can change the transfer date to a future date (as long as it's a working day), there is a "calendar" button to allow this to be done easily using a pop-up calendar.

Transfers already added to the batch can be removed by selecting them in the list and clicking "Remove selected" button as necessary. If the details of a transfer require editing then the transfer must be removed and re-added, it cannot be edited directly (unlike with the Multiple Transfers process) as the screen design does not support this.
Once the screen has been completed click the "Submit" button to send the transfer batch request to Openreach.
| You may also want to view: | ||
| Single Transfer Process | Multiple Transfers | Bulk Transfers |
| Previous subject | Main Navigation | Next subject |